Tokens -> Shapes#
Shape#
Base class for shapes
- class miniworldmaker.tokens.token_plugins.shapes.shapes.Shape(position=None)[source]#
Shape is the parent class for various geometric objects that can be created.
Each geometric object has the following properties:
border: The border thickness of the object.
is_filled: True/False if the object should be filled.
fill_color: The fill color of the object
border_color: The border color of the object.
Point#
Circle#
- class miniworldmaker.tokens.token_plugins.shapes.shapes.Circle(position=(0, 0), radius=10)[source]#
A circular shape, definied by position and radius

- Parameters:
position – The position as 2-tuple. The circle is created with its center at the position
radius – The radius of the circle
Examples
Create a circle at center position (200,100) with radius 20:
Circle((200, 100), 20)
Create a circle at topleft position
miniworldmaker.Circle.from_topleft((100,100),50)
- property radius#
The radius of the circle. If you change the circle-size (e.g. with self.size = (x, y), the radius value will be changed too.
Ellipse#
- class miniworldmaker.tokens.token_plugins.shapes.shapes.Ellipse(position=(0, 0), width=10, height=10)[source]#
An elliptic shape.
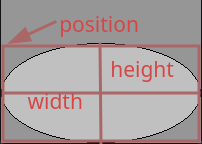
- Parameters:
position – The position as 2-tuple. The ellipse is created at topleft position
width – The width of the ellipse
height – The height of the ellipse
Examples
Create an ellipse at topleft position (200,100) with width 20 and height 30
Ellipse((200, 100), 20, 30)
Create an ellipse at center-position (200,100) width width 10 and height 10
miniworldmaker.Ellipse.from_center((100,100),10, 10)
(Alternative) Create an ellipse at center-position (200,100) with width 10 and height 10
e = miniworldmaker.Ellipse((100,100),10, 10)
e.center = e.position
Line#
- class miniworldmaker.tokens.token_plugins.shapes.shapes.Line(start_position, end_position)[source]#
A Line-Shape defined by start_position and end_position.
- Parameters:
start_position – The start_position as 2-tuple.
end_position – The end_position as 2-tuple.
Examples
Create a line from (200, 100) to (400, 100)
Line((200, 100), (400,100))
Create a line from (200, 100) to (400, 100)
l = Line((200, 100), (400,100))
l.border = 2
- property border#
-> see border
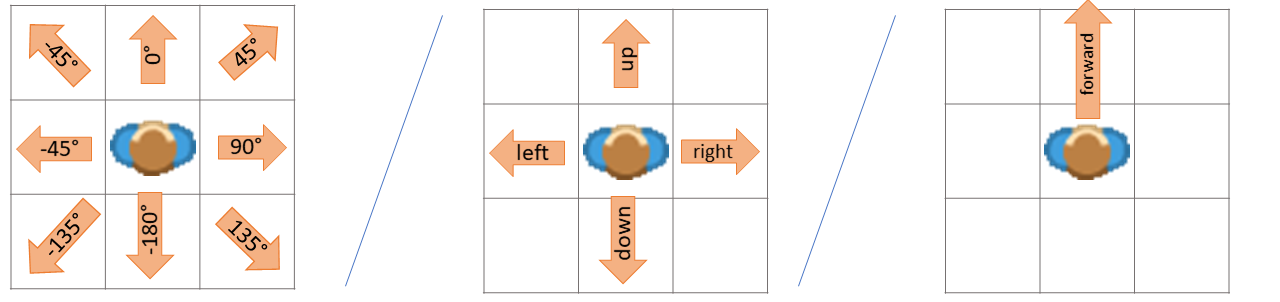
- property direction#
Directions are handled exactly as in the Scratch programming language, see: Scratch Wiki
The default direction is
0°. All tokens are looking"up"
Values for Direction
0°or"up": up90°or"right": Move right-90°or"left": Move left180°or"down": Move down"forward": Current direction
Sets direction of the token.
You can use an integer or a string to describe the direction
- Options
0,"up"- Look up90,"right", - Look right-90,"left", - Look left-180,180,"down"- Look down
Examples
Move in a direction with WASD-Keys
def on_key_down(self, keys):
    if "W" in keys:
        self.direction = "up"
    elif "S" in keys:
        self.direction = "down"
    elif "A" in keys:
        self.direction = "left"
    elif "D" in keys:
        self.direction = "right"
    self.move()
Move 45°:
from miniworldmaker import *

board = Board(100, 100)
c = Circle ((50,50), 10)

@c.register
def act(self):
    c.direction = 45
    c.move()

board.run()
Move -45°:
from miniworldmaker import *

board = Board(100, 100)
c = Circle ((50,50), 10)

@c.register
def act(self):
    c.direction = -45
    c.move()

board.run()
- property end#
- property end_position#
- property length#
- property line_width#
-> see border
- property start#
- property start_position#
- property thickness#
-> see border
Rectangle#
- class miniworldmaker.tokens.token_plugins.shapes.shapes.Rectangle(topleft=(0, 0), width=10, height=10)[source]#
A rectangular shape defined by position, width and height
- Parameters:
topleft – Topleft Position of Rect
height – The height of the rect
width – The width of the rect
Examples
Create a rect with the topleft position (200, 100), the width 20 and the height 10
Rectangle((200, 100), 20, 10)
- classmethod from_center(position, width, height)[source]#
Creates a rectangle with center at position
Polygon#
- class miniworldmaker.tokens.token_plugins.shapes.shapes.Polygon(*args, **kwargs)[source]#
A Polygon-Shape.
- Parameters:
point-list – A list of points
Examples
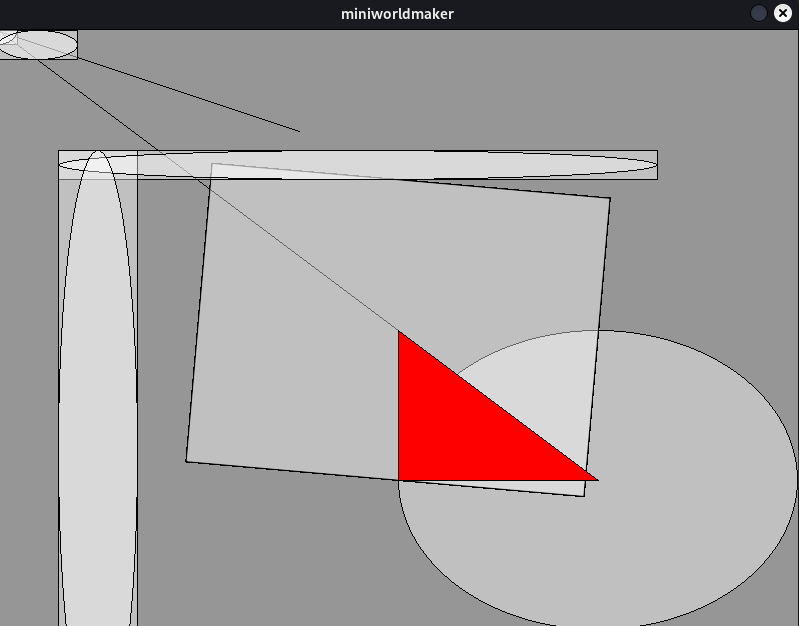
Example Creation of a polygon
>>> Polygon([(200, 100), (400,100), (0, 0)])
Creates a red polygon with the vertices (200, 100) , (400, 100) and (0, 0)
Example Creation of a filled polygon
>>> Polygon([(200, 100), (400,100), (0, 0)])
Creates a red polygon with the vertices (200, 100) , (400, 100) and (0, 0)
- property pointlist#